
If you are beginner looking to learn step by step embroidery stitches, don’t go away! This tutorial will take you through beginner friendly embroidery stitches in a super simple, easy-to-understand way. It’s a Beginners Step by Step Embroidery Stitches guide First off, you do not really need any special artistic skills at all-just a needle, some thread and a little patience.
Embroidery is wonderful, relaxing and beautiful. When you know these basic embroidery stitches well, your clothes, your handbags and even handkerchiefs are anyone can personalize them, no matter their skill level or how much time they’ve spent learning.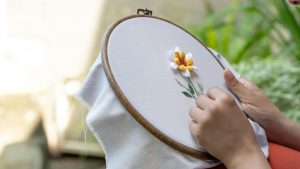
Things You Need to Start Embroidery:
Before delving into the stitches, let’s gather the essential tools you’ll require. No need to fret, you likely already have some of these items on hand! Beginners Step by Step Embroidery Stitches and all you need to know
Embroidery Hoop: Maintains fabric taut and simple to work on.
Needle: A sharp embroidery needle is essential!
Embroidery Thread (Floss): Select a few favorite colors.
Fabric: Cotton is typically the top choice for beginners because it’s forgiving and easy to stitch through.
Scissors: Small, sharp scissors are perfect for cutting thread.
Pencil or fabric marker: for drawing your designs onto the fabric.

Your First Stitches: Easy Step-by-Step Embroidery Stitches for Beginners
Let’s now explore the key and simplest embroidery stitches suitable for beginners. Additionally, These stitches are easy to grasp and highly versatile for various design tasks! It’s your Beginners Step by Step Embroidery Stitches guide.
1. Running stitch:
This stitch serves as the foundation for numerous other sewing ways and is generally the first one newcomers attack.
How to do it:
- First, Begin by bringing your needle up from the reverse of the fabric.
- Next, Push it down a short distance away, forming a modest stitch.
- Then, Continue this system, creating small, even, and straight aches.
Use: Quick outlines or uncomplicated borders.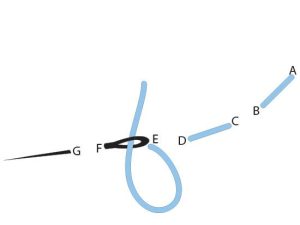
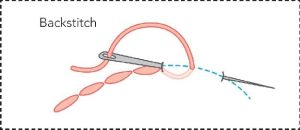
2.Backstitch:
The backstitch is sturdier and the line is more continuous than the running stitch.
How to do it:
- Firstly, Pull your needle up from the back of the fabric.
- Make a stitch forward.
- Next, bring your needle up close to your last stitch, and then push it back down into the fabric a little further along
Use: Great for lines, letter writing, borders, detail and features.
3.Satin Stitch:
I love using this stitch for filling in shapes because it gives you a beautiful, solid color that looks totally seamless.
How to do it:
- Point your needle at one edge of the shape you’re filling and come up.
- Bear the needle straight across through the shape and bringing it out at the opposite edge.
- Do this, placing your stitches as near side by side as possible, the whole void or blank being thus filled.
Use: Perfect for filling in leaves, petals, or any solid shapes.

4.French Knot:
The French knot appears to be a fine dot or knot at the fabric’s surface.
How to do it:
- With the tip of the needle emerging on the right side of the fabric.
- Double-thread your needle with the thread.
- Repeat the process, pushing the needle back down into the fabric very near where it first emerged (though not through the exact same hole).
Use: Suitable for making small decorations on mobile phone graphic characters, mixed embroidered characters or flower centers etc.

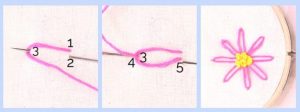
5.Lazy Daisy Stitch:
Lazy Daisy stitch It is so cute, and can be used to make tiny flower petals or similar little designs!
How to do it:
- Firstly, Bring your needle up.
- Now, loop your thread and use your thumb or finger to hold it lightly in place.
- Insert the needle down again near the point where the thread emerged, and pull it back through a short distance away to “lock” the loop into place with a small stitch over the loop.
Use: This stitch is perfect for creating delicate details like flower petals, leaves, or any series of small, connected shapes that require a smooth, flowing line.
Easy Tips for Beginners: Step by Step Stitches TO Make your Embroidery successful
Ready to get hand embroidery stitches ? And contrarily are some helpful hints to get you started:
- Firstly, Always use good light: It makes your stitches easier to see and helps stop eye strain . Stitching in the dark can lead to headaches and mistakes, so proper lighting is essential.
- Work with even, small stitches: Your work looks more professional and neater in the long run.
- Practice, practice, practice: Test every stitch on a scrap piece of fabric before incorporating it into your main design.
- Do not pull the thread too tightly: This will cause your fabric to pucker. Use enough tension to lay flat.
- And last, Be patient: It takes time to learn, and it’s going to get easier and more fun when you practice!
In Conclusion
Embroidery is literally the best – it’s so much fun, really relaxing, and honestly, anyone can pick it up!. Now with these simple step-by-step embroidery stitches for beginners you have some great options to start that journey with something beautiful and unique. For instance, Begin with these simple stitches and once you’re feeling more comfortable, you can start playing around with other stitches and see what you can create!
FAQ for Beginners Step by Step Embroidery Stitches
What is the easiest embroidery stitch for beginners?
Running stitch is the easiest and a good place to start for complete beginners.
Do I need a hoop for hand embroidery?
It helps, but it’s not always necessary for small designs.
Can kids learn embroidery?
Yes! With a blunt needle and supervision, kids can learn basic stitches easily with consequently practice.
Follow @theartsofembroidery for more such blogs.